
This is the first part of an upcoming post series that should contain some tipps and tricks about embedding SharePoint Content in Office documents. You can find another related post about metadata Connections using default quickparts here: Connecting SP Metadata to Office
With this post I would like to give you a practical example on how to generate your own custom properties for a .docx document using the Open XML SDK and SharePoint 2010/2013.
First we should define a target. The goal of this exercise would be to display document audit information inside our word document, as this information is not part auf Office/SharePoint quickpart integration. The document should provide us with information about the approver and publisher of our document, as well as the approval and publishing date times.
Open XML SDK
Depending on the SharePoint Version you use, please download the appropriate Open XML SDK’s.
- .NET 3.5 (SP2010) – Open XML 2.0
- .NET 4.0 (SP2013) – Open XML 2.5
Please ensure that you install the SDK and the library DocumentFormat.OpenXml.dll is placed inside the Global Assembly Cache or is part of your SharePoint WSP package definition.

Event Receiver
This exercise will not in depth explain on how to build and assign a SharePoint library event receiver so let us assume that there is already a receiver in place and it reacts on the library updated event. Note: In order to retrieve information about the actual user we run this event synchronous.
[sourcecode language=”csharp”]
public override void ItemUpdated(SPItemEventProperties properties)
{
this.EventFiringEnabled = false;
// Two strings to hold our custom property values
var approvalInfo = “-“;
var pubInfo = “-“;
// check the current workflow status by SP builtin field moderation status
// 0 = Approved
// 1 = Rejected
// 2 = Published / Waiting for approval
if (properties.ListItem[SPBuiltInFieldId._ModerationStatus].ToString() == “0”)
{
approvalInfo = string.Format(“{0} by {1} at {2}”, “Approved”, properties.UserDisplayName, DateTime.Now.ToShortDateString());
}
else if (properties.ListItem[SPBuiltInFieldId._ModerationStatus].ToString() == “1”)
{
approvalInfo = string.Format(“{0} by {1} at {2}”, “Rejected”, properties.UserDisplayName, DateTime.Now.ToShortDateString());
}
else if (properties.ListItem[SPBuiltInFieldId._ModerationStatus].ToString() == “2”)
{
pubInfo = string.Format(“{0} by {1} at {2}”, “Published”, properties.UserDisplayName, DateTime.Now.ToShortDateString());
}
CreateUpdateDocumentProperties(properties.ListItem, approvalInfo, pubInfo);
this.EventFiringEnabled = true;
}
[/sourcecode]
As you may see, we react on the audit events directly when they occur. Another quite nice extension to the approver, publisher and time would be to create additional custom properties for the comments they maintain during publishing or approval.
Add / Update Word Custom Properties
First of all let us have a look inside the overall document processing function.
[sourcecode language=”csharp”]
///
///
/// CustomDocumentProperty enumerator/list
///
internal static int GetNextPropertyId(Properties props)
{
int pid = 1;
foreach (CustomDocumentProperty p in props)
{
if (p.PropertyId > pid)
{
pid = p.PropertyId;
}
}
return (pid + 1);
}
///
///
/// CustomDocumentProperty enumerator/list
/// Info string about document approval
/// Info string about document publishing
///
internal static bool CreateUpdateDocumentProperties(SPListItem item, string approveInfo, string publishInfo)
{
// We only like to process docx documents
if (!Path.GetExtension(item.File.Name).Equals(“.docx”, StringComparison.InvariantCultureIgnoreCase))
{
return false;
}
// We do not make changes on locked or checkedout files
if (item.File.LockType != SPFile.SPLockType.None || item.File.Level == SPFileLevel.Checkout)
{
return false;
}
// Open the file binary stream
using (Stream fs = item.File.OpenBinaryStream())
{
bool hasUpdates = false;
// Open the file with open xml sdk
using (WordprocessingDocument doc = WordprocessingDocument.Open(fs, true))
{
// Get the custom properties definition
var customProps = doc.CustomFilePropertiesPart;
if (customProps == null)
{
// Create a new custom properties definition if not exists
customProps = doc.AddCustomFilePropertiesPart();
customProps.Properties = new DocumentFormat.OpenXml.CustomProperties.Properties();
}
var props = customProps.Properties;
// Get the next available property id
int pid = GetNextPropertyId(props);
var propertyName = “Audit_ApprovalInfo”;
CustomDocumentProperty prop = null;
var searchProp = props.Where(p => ((CustomDocumentProperty)p).Name.Value == propertyName).FirstOrDefault();
// Does the property allready exist?
if (searchProp == null)
{
prop = new CustomDocumentProperty();
prop.FormatId = “{D5CDD505-2E9C-101B-9397-08002B2CF9AE}”;
prop.Name = propertyName;
prop.PropertyId = pid;
prop.VTLPWSTR = new DocumentFormat.OpenXml.VariantTypes.VTLPWSTR(approveInfo);
props.AppendChild(prop);
hasUpdates = true;
pid++;
}
else
{
prop = searchProp as CustomDocumentProperty;
// Check if the value has changed
if (prop.VTLPWSTR == null || prop.VTLPWSTR.Text == null || (prop.VTLPWSTR.Text != null && !prop.VTLPWSTR.Text.Equals(approveInfo)))
{
prop.VTLPWSTR = new DocumentFormat.OpenXml.VariantTypes.VTLPWSTR(approveInfo);
hasUpdates = true;
}
}
propertyName = “Audit_PublishInfo”;
searchProp = props.Where(p => ((CustomDocumentProperty)p).Name.Value == propertyName).FirstOrDefault();
// Does the property allready exist?
if (searchProp == null)
{
prop = new CustomDocumentProperty();
prop.FormatId = “{D5CDD505-2E9C-101B-9397-08002B2CF9AE}”;
prop.Name = propertyName;
prop.PropertyId = pid;
prop.VTLPWSTR = new DocumentFormat.OpenXml.VariantTypes.VTLPWSTR(publishInfo);
props.AppendChild(prop);
hasUpdates = true;
pid++;
}
else
{
prop = searchProp as CustomDocumentProperty;
// Check if the value has changed
if (prop.VTLPWSTR == null || prop.VTLPWSTR.Text == null || (prop.VTLPWSTR.Text != null &&!prop.VTLPWSTR.Text.Equals(publishInfo)))
{
prop.VTLPWSTR = new DocumentFormat.OpenXml.VariantTypes.VTLPWSTR(publishInfo);
hasUpdates = true;
}
}
// Save our changes to xml
props.Save();
// Set update fields option and place it in xml settings part
DocumentSettingsPart settingsPart = doc.MainDocumentPart.GetPartsOfType
UpdateFieldsOnOpen updateFields = new UpdateFieldsOnOpen();
updateFields.Val = new DocumentFormat.OpenXml.OnOffValue(true);
settingsPart.Settings.PrependChild
settingsPart.Settings.Save();
}
if (hasUpdates)
{
item.File.SaveBinary(fs);
}
return hasUpdates;
}
}
[/sourcecode]
Let us have a look at some of the basic functionality.
- The method “GetNextPropertyId” provides us with a uniqe and incremented id for our new custom properties. If no properties are assigned the first valid id is 2.
- As we only want to save the document when there are changes to our property values the code does a comparsion between the actual and the given value.
- When opening a word document in your client application custom properties need to be refreshed manually by the user. The UpdateFieldsOnOpen Attribute forces an update message when the user updates the document. There will be another blog post regarding the updates of custom properties soon.
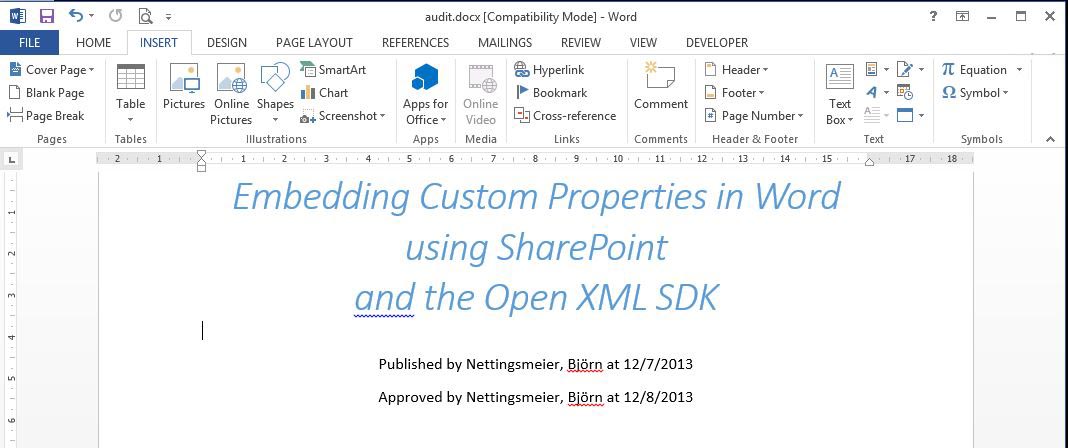
The Result
First of all we added the Event Receiver to our document library and enabled versioning, as well as content approval. If we now publish and approve a document and open it in MS Word we can easily embed the publish and approval info.
To insert a custom property inside the document choose the “Insert” tab and navigate to “Quick Parts / Field”.
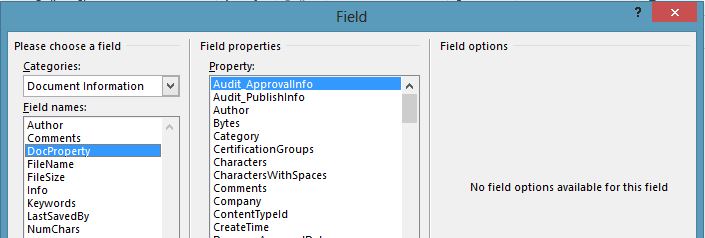
Within categories choose “Document Information” and “DocProperty” as Field Name. Now you should see a list of all custom properties starting with our two new Audit properties. Simply select them to place/embed it to our document. You can place them inside the main Content as well as Header and footer area. A quick look at our result:
In my next post I will write about some exceptions and hints that may come up with custom properties like versioning and updates. Also I will give a quick overview of documet conversions with word automation Services and on how these conversions can help us processing and updating custom properties.
As soon as the next post is completed I will provide a link here.
Thanks for the post. I was having trouble figuring out how to use OpenXML to update a custom property. I was able to follow your code and port it to PowerShell with ease.
Thanks again..
when I use this code, I have an error message when I open the .docx file, the file corrupted !! Do you Have any ideas from what the error is done?
Thanks
Very interesting and valuable information!
Will your solution work across site collections or should one store these metadata in some of the properties listed in “Core Document columns”?