There are several ways to customize a listform in SharePoint. I wrote already about this topic previously a post serie (three parts). In this post i’d like to show you a different way to create custom list forms. This time i write about the so called listfielditerator and the rendering template.
What is a listfielditerator?
This part of SharePoint is responsible for the outcome of each field. With the field iterator it is possible to change some rendering behaviour as well as using the method isFieldExcluded. This method is used to exclude fields from the form. MSDN Article
What is a rendering template?
A rendering template defines the outcome of the whole aspx page for the listform. By the way, if i talk about listform i mean the display, edit and new form of a list or library. Back to the rendering template which defines the controls that have to be loaded and how they look alike. It also contains the listfielditerator.
Starting point:
First in the solution we need a mapped folder to the controltemplates folder in the 15 Hive of SharePoint. In this folder the ascx file is created to define the rendering template. We have a teamsite, in which are already some lists. We will just create an easy custom list with some columns and change its form.
After that we need a code file (.cs) in which create a class which inherits from Listfielditerator. Let’s see the details:
Creating the listfielditerator
ok, create a .cs file. I created it in a folder Called CodeBehind. The class we call ILSListfieldIterator inherits from Listfielditerator. In this class you can define methodes like the XXX which can define that some fields will not be shown in the form.
![]()
[sourcecode language=”csharp”]
namespace ILS.ListCoding.CodeBehind
{
public class ILSListfieldIterator : ListFieldIterator
{
protected override bool IsFieldExcluded(Microsoft.SharePoint.SPField field)
{
bool result = base.IsFieldExcluded(field);
//If field matches the name of exclude it
if (field.InternalName == “SharePoint”)
{
return true;
}
return result;
}
}
}
[/sourcecode]
Creating the rendering template
We have to map the folder controltemplates which is stored in this location%ProgramFiles%\Common Files\Microsoft Shared\web server extensions\15\TEMPLATE\ and after that we insert a new item which is an user control (ascx file).
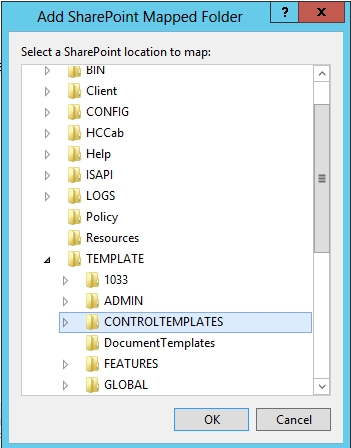
In this user control we have to do two things: first we copy the normal rendering template. We can find the normal listform rendering template in this location: %ProgramFiles%\Common Files\Microsoft Shared\web server extensions\15\TEMPLATE\controltemplates\DefaultTemplates.ascx In this there should a rendering template called “listform”.Copy the rendering template itself and paste it into your usercontrol.
Then we give the rendering template a new id/name. We call it ILSListForm. In the registering section, we also put our listfielditerator. So that we can replace the default one with ours.
[sourcecode language=”csharp”]
< %@ Assembly Name="$SharePoint.Project.AssemblyFullName$" %>
< %@ Assembly Name="Microsoft.Web.CommandUI, Version=15.0.0.0, Culture=neutral, PublicKeyToken=71e9bce111e9429c" %>
< %@ Register Tagprefix="SharePoint" Namespace="Microsoft.SharePoint.WebControls" Assembly="Microsoft.SharePoint, Version=15.0.0.0, Culture=neutral, PublicKeyToken=71e9bce111e9429c" %>
< %@ Register Tagprefix="Utilities" Namespace="Microsoft.SharePoint.Utilities" Assembly="Microsoft.SharePoint, Version=15.0.0.0, Culture=neutral, PublicKeyToken=71e9bce111e9429c" %>
< %@ Register Tagprefix="asp" Namespace="System.Web.UI" Assembly="System.Web.Extensions, Version=3.5.0.0, Culture=neutral, PublicKeyToken=31bf3856ad364e35" %>
< %@ Import Namespace="Microsoft.SharePoint" %>
< %@ Register TagPrefix="wssuc" TagName="ToolBar" src="~/_controltemplates/15/ToolBar.ascx" %>
< %@ Register TagPrefix="wssuc" TagName="ToolBarButton" src="~/_controltemplates/15/ToolBarButton.ascx" %>
< %@ Register TagPrefix="ILS" Namespace="ILS.ListCoding.CodeBehind" Assembly="$SharePoint.Project.AssemblyFullName$" %>
< %@ Register Tagprefix="WebPartPages" Namespace="Microsoft.SharePoint.WebPartPages" Assembly="Microsoft.SharePoint, Version=15.0.0.0, Culture=neutral, PublicKeyToken=71e9bce111e9429c" %>
< %@ Control Language="C#" CodeBehind="ILSCustomListForm.ascx.cs" Inherits="ILS.ListCoding.CONTROLTEMPLATES.ILSCustomListForm" %>
..:: I Like SharePoint ::..
|
|
[/sourcecode]
connect the rendering template with the listform by code or by schema.xml
Now we have to connect the rendering template with the list. So we have two options. One option is to use the code in a feature activation method:
[sourcecode language=”csharp”]
public override void FeatureActivated(SPFeatureReceiverProperties properties)
{
SPSite site = properties.Feature.Parent as SPSite;
SPWeb web = site.RootWeb;
try
{
if (web != null)
{
SPList listILS = web.GetList(SPUrlUtility.CombineUrl(web.ServerRelativeUrl, “/Lists/Ilikesharepoint”));
SPContentType ct = listILS.ContentTypes[0];
ct.NewFormTemplateName = “ILSListForm”;
ct.Update();
}
}
catch (Exception fx)
{
SPUtility.TransferToErrorPage(“Error occured
Error Message: ” + fx.Message);
}
}
[/sourcecode]
The second option is to define it in the schema.xml file of your list (at the form tag) of your content type. There you can insert the name of your rendering template.
[sourcecode language=”csharp”]
[/sourcecode]
That’s it. If you now deploy your solution you should see your custom listform.
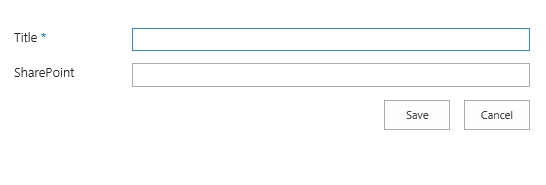
It normally looks like this:
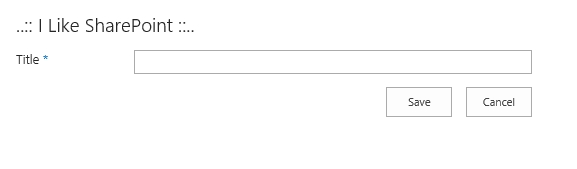
Now it looks like this: (see the header and the field sharepoint is not visible)
..:: I LIKE SHAREPOINT ::..
Hello
So we cant use That for the cloud ?
At this time – no you can’t.
Great example, I used it today, but there is one point you need to mention. Since you deploy a class that inherits from control and shall be used in your solution (the iterator specialization), it needs to be registeres as a safeControl by the solution.
Kind regards!
Peter
thanks for your comment and the hint!
User ListFieldIterator.ExcludeFields, It’s Specify the fields that don’t need to be rendered. Separate each field with ;#