Did you ever should offer a solution for a customer and first thought of developing everything from scratch? It doesn’t matter if you’re a developer, a consultant or whatever.
You should be lazy, you should use what have been already developed and tested, you should be smart!
If you’re smart you just try to use standards & standard features as far as it will go and you try to offer a solution which fits the needs of your customer. But many people don’t know how far they can go with SharePoint. SharePoint has huge capabilities to offer solutions based on its out-of-the-box features which are almost in every company available.
In such a scenario we surprised a customer who thought he knows that his process is not manageable with the standard features of SharePoint and he was ready to pay for development of his tool based on SharePoint.
As you know a custom solution which needs to be deployed on a big SharePoint farm needs
- to be developed,
- a user requirement,
- a functional description,
- a testing script,
- needs a higher budget
and of course you have to check the performance. What happens if you want to upgrade to SharePoint 2013? Would it still works? Do you need to redevelop it?
To cut a long story short let me only describe one enabler for surprising the customer. One of the most important requests to this solution was the usage of dependent forms in a SharePoint list, so called cascading dropdown lists. In the upcoming lines you’ll get a step by step explanation how we did it by using the standard features of SharePoint. I’d like to highlight a post written by Marcel Meth which helped us (Link to article).
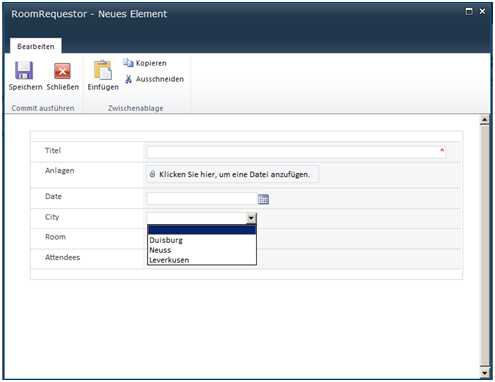
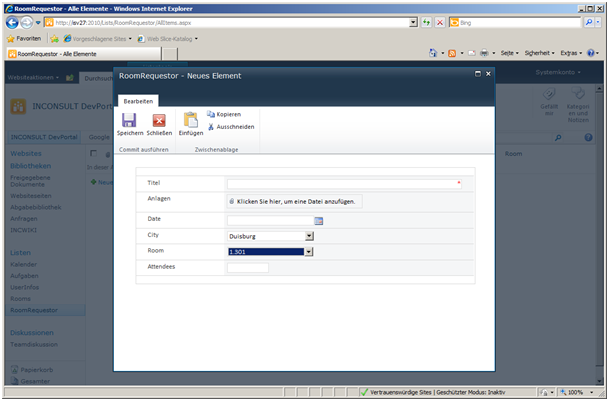
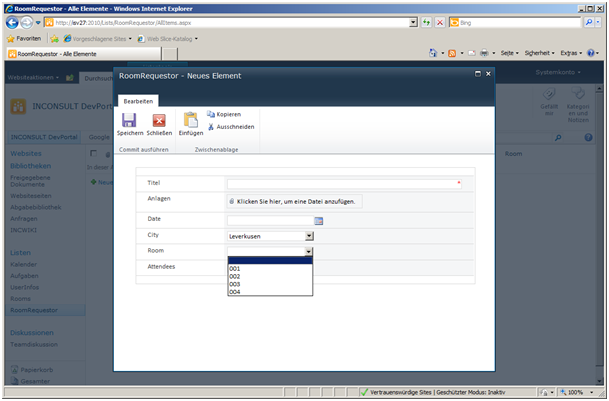
Let’s starting with a small imaginery story. You like to have a SharePoint list in which you can request a room for a meeting. You use therefore a nice form which has entry forms for title, date, location, room no. and the amount of attendees. The choice of the room no. should be dependent on what location you choose.
Step 1: Create a list for room numbers and city
- Create a new list and call it “rooms”
- Create a new column for the city and call the title column “Room”
- Create some entries for this list

Step 2: Create your RoomRequestor list
Well, the first list is ready. Now, let’s using some other features of SharePoint Enterprise Edition.
-
Create a custom list and call it “RoomRequestor”. Go to the ribbon tab “list” and choose “Customize Form”

Now the InfoPath 2010 Client opens the form for this list.
-
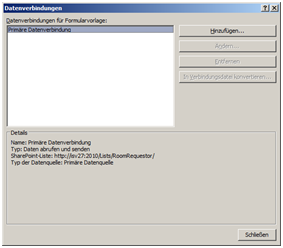
Add a receive Connection to the list “Rooms”
- Click on Manage Data Connections…
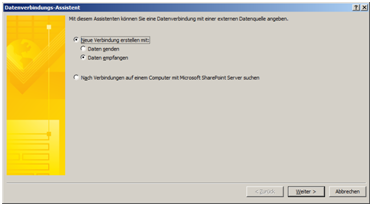
- Click on Add
- Click on Receive data and on Next
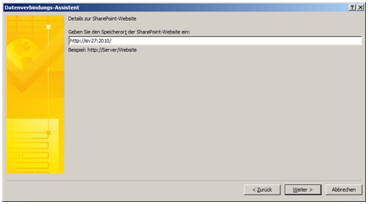
- Click SharePoint Library or list and then on Next
- Provide the url of the “Rooms” list and click on Next
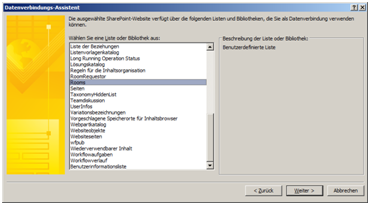
- Choose the “Rooms” list and click on Next
- Check off “Rooms” and “City” and click on Next
- Always click on Next till you finished
Screenshot-Wall for these steps:
 |
 |
 |
 |
 |
 |
As you can see, we didn’t use source code.
-
Create the fields on the form
- A date-field for the date
- A dropdown-list for city
- A dropdown-list for rooms
- A Textfield for the sum of attendees
Now the really interesting part begins. We are going to develop the cascading dropdown-lists. At first we have to fill the dropdown-list for the city.
Step 3: Creating the dropdown-lists with dependencies
Click on the form field for “city” and go to properties. Choose at List Box Choices the “Get choices from external data source” and use your data connection “Rooms” we created earlier this morning. You set as values and display name the column City.

After Clicking on OK, you can see already the first result.
Well, let’s go on filling the second dropdown-list. Therefore you should reopen the entry form in the InfoPath Designer by using the button “Customize Form”.
Now we are going to set the field “rooms” – open the properties. Just do the following:
- Choose “Get Choices from an external data sources”
- Pick the “Rooms” list as data source
-
Click on the button next to the entries

-
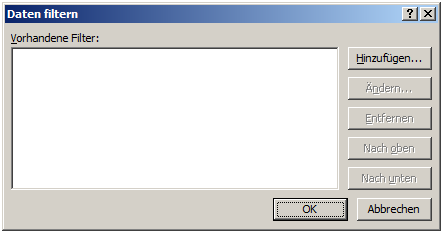
Click then on Filter Data
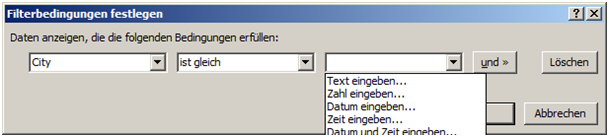
We are now filtering the data for the values choosen from form field city.

-
Add filter
-
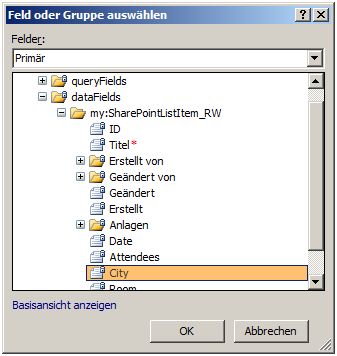
After this select “Field or Group…” and select the primary data source…

-
In the primary data source you choose the data field “City”. Why? You only want to show the rooms of the selected city, there you set the filter.
- Now you have to click OK or Next to close all the opened windows.
Now the second dropdown-list is filled only with rooms which are located in the selected city from the first dropdown-list. We have to do one more step. This step makes the form better, so please read on.
-
Step 4: Create a rule for the City-field
You create this rule because you want to have a really nice form. If you don’t set the rule, the dropdown field for “Room” will not update in that moment in which you change the city. But we would like to present a solution which meets the business needs and the user expectation.
- Mark the field “City”
-
Click on “Manage Rules” and then add a new rule
The rule takes action if the field is changed
- Click on Add Action and choose to change the value of a field
-
Now you choose the field “Room” and leave value empty.

What do you think what now happens? Exactly, if you change the city, the room field gets empty.
Step 5: Look at your solution and thank God it’s cool to work with SharePoint
We did not use any code and the solution works with the standard features of SharePoint 2010. You just click, use some features and you’re ready.
I like these simple and smart solutions which are possible with SharePoint and InfoPath.
..:: I LIKE SHAREPOINT ::..
Leave a Reply
You must be logged in to post a comment.