
If you are working on a migration from SharePoint OnPremise to SharePoint Online and you have to migrate SharePoint list forms based which were customized as InfoPath forms, you can consider to migrate them 1:1 or replace them by PowerApps. Recommendation is normally PowerApps and use a canvas apps as standalone or as SharePoint form. But there are also reasons to just migrate the InfoPath form as is, for example if you plan to retire the application in near future.
Last scenario i had to find a solution. The InfoPath form was not migrated by the Microsoft SharePoint Migration Tool. The trick is: Migrate the list or site. After doing so, you take your InfoPath form, export it, change some values in xml and republish to SharePoint Online. That helped me. It is not really a way to migrate a dozens of InfoPath forms but it is a way.
Migrate the InfoPath Form
Let me describe how i worked on the InfoPath form in order to get it running in SharePoint Online.
You export the InfoPath form, change it to a cabinet file. Then you work on the xsf settings and update Urls and IDs and afterwords you put it together as template.xsn file which you can deploy in your new SharePoint Online list. Sounds easy, i recommend you to read through the steps and then concentrate on your form, close MS Teams and Outlook and just do it with a positive focus. I did it a few years ago in order to move a form to another list, but it’s almost the same. I updated myself by reading this post.
Prequerisites
In order to be successfully you should prepare the following points:
- SharePoint Online Setting: InfoPath forms can render in Browser
- Read Permissions in old System at mininum
- InfoPath Designer 2013
- The user who publishes the form has permissions to do so in SharePoint Online; Edit or higher permission on destination
- Notepad or other editor
- Migrate the list from source to destination.
You should check if you can render InfoPath forms in your tenant. Go to SharePoint Admin Center -> More features -> InfoPath open.

Export the InfoPath
Go to the SharePoint list, click on Customize Form in the ribbon bar.
Then click in InfoPath Designer on File -> Publish -> Export source files.

Changes in InfoPath structure
- Rename the file to template.cab instead of template.xsn
- Extract the contents of the cab
- Update the manifest.xsl file and replace URLs and IDs
You have to replace old URLs and IDs with the new ones. So in order to get the new ones you can open the Source SharePoint in your browser. For the listId just open the list settings. You’ll find the list id at the end of the url. Copy this and use an Url Decoder to decode it the right way.
For the content type id you just need to go to the content type in the list. If the content type is not visible, you can go to advanced list settings and enable management of content types. At the end of the url you find the id after ctype=
It helps you to store those both ids in a txt file or notepad file separately. Then open the manifest.xsf file in notepad++ (recommendation) and replace all Urls, and update the ids. Urls should be absolute urls.
Check also runtimeCompatibilityURL in this file.
- Change each data connection and replace siteURL, SharePointListID, relativeListURL to the new ones.
- Create the new template.xsn file
- Open cmd.exe
- cd to the path where you stored the manifest.xsf
- run the following command: dir /a-d /b > ..cabfiles.txt
- This txt file is now in the folder above and have a list with all files. This will be our definition file for the makecab command
- add the absolute path in front and add quotes at start and end of each file
- Add definition infos
- add some settings to the file like this:
.OPTION EXPLICIT
.Set CabinetNameTemplate=template.XSN
.set DiskdirectoryTemplate=”C:\Users\UserName\Downloads\Infopath\disk1″
.Set Cabinet=on
.Set Compress=on
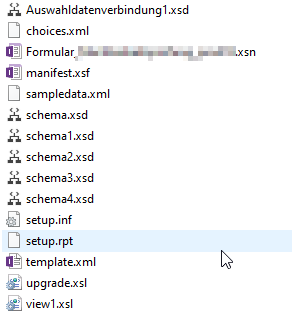
“C:\Users\UserName\Downloads\Infopath\Auswahldatenverbindung1.xsd”
“C:\Users\UserName\Downloads\Infopath\choices.xml”
“C:\Users\UserName\Downloads\Infopath\manifest.xsf”
“C:\Users\UserName\Downloads\Infopath\sampledata.xml”
“C:\Users\UserName\Downloads\Infopath\schema.xsd”
“C:\Users\UserName\Downloads\Infopath\schema1.xsd”
“C:\Users\UserName\Downloads\Infopath\schema2.xsd”
“C:\Users\UserName\Downloads\Infopath\schema3.xsd”
“C:\Users\UserName\Downloads\Infopath\schema4.xsd”
“C:\Users\UserName\Downloads\Infopath\setup.inf”
“C:\Users\UserName\Downloads\Infopath\setup.rpt”
“C:\Users\UserName\Downloads\Infopath\template.xml”
“C:\Users\UserName\Downloads\Infopath\upgrade.xsl”
“C:\Users\UserName\Downloads\Infopath\view1.xsl”
It should look like this afterwords:

- run in cmd.exe following command: makecab.exe /f cabfiles.txt This should look like this when it’s finished
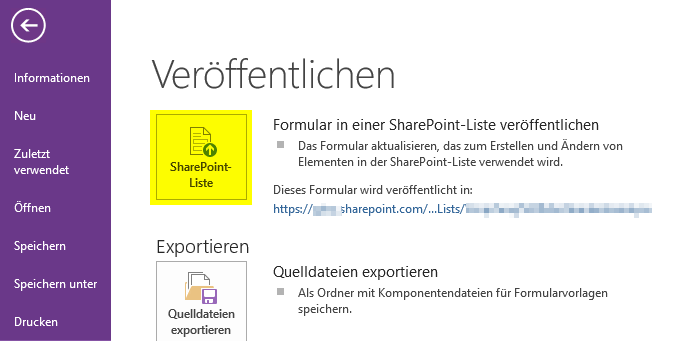
Deploy InfoPath
Now you can open the template.xsn file with InfoPath Designer and publish it to the list. Afterwords your list should be working again with InfoPath in SharePoint Online.
Thank you for this. Easily the best guide I’ve seen on migrating these forms.