I already build up an easy workflow for SharePoint with Visual Studio, but i never did develope a custom SharePoint Designer workflow action. But now i got a requirement in a project in which we need to provide the possibility to convert an office document to pdf and store it in a completely different Site Collection.
Cause this part of action will be needed some more often, we decided to build up a custom SharePoint Designer Worklfow action. We had a SharePoint 2013 platform but no workflow manager in this farm. So the custom action is based on SharePoint 2010 workflow platform. The other great thing of custom SPD Workflow actions is that you can update them more easily than workflows itself. You do not need to update the whole workflow. You only need to update them if you change the .action file (you see later what it’s all about) and you can use them in every SharePoint Site you have.
So what is this? A SharePoint Designer Workflow Action is a piece of code, which will be executed inside the workflow. It can use parameters and variables. You know it from SharePoint Designer if you build workflows. You’ll find those actions in the ribbon and use it to define the steps a workflow should do.
Let me show you how we succeded using this cool feature.
At first we create an empty SharePoint 201x Solution (depends on your dev machine).
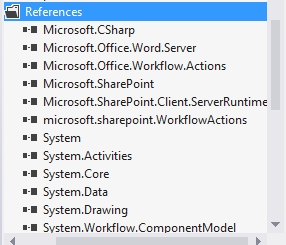
We add these references:
Microsoft.SharePoint.WorkflowActions
System.Workflow.ComponentModel
System.Workflow.Activities
Microsoft.Office.Workflow.Actions
Now we add a mapped folder to this path:
/15/Templates/1033/workflows/
In this path we later add our worklow custom action definition.
Now we create a new class file in your solution which contains the logic and the code for your custom SP Designer workflow action.

It should have those usings:
using Microsoft.SharePoint.Workflow;
using Microsoft.SharePoint.WorkflowActions;
using System.Workflow.ComponentModel;
using System.Workflow.ComponentModel.Compiler;
The class should inherit from Activtity.
After that you define the parameters. There are some which need to be set by the workflow author, so that the custom action is more flexibel and can be used by almoste every workflow. We see them later in the action file again. After defining the properties we build the method which cares about the executive code. So here is the logic of your custom action.
[sourcecode language=”csharp”]
namespace aspSPDActivity
{
public class CopyFile : Activity
{
public static DependencyProperty SiteUrlProperty = DependencyProperty.Register(“SiteUrl”, typeof(string), typeof(CopyFile), new PropertyMetadata(“”));
[ValidationOption(ValidationOption.Optional)]
public string SiteUrl
{
get { return ((string)(base.GetValue(CopyFile.SiteUrlProperty))); }
set { base.SetValue(CopyFile.SiteUrlProperty, value); }
}
public static DependencyProperty ListNameProperty = DependencyProperty.Register(“ListName”, typeof(string), typeof(CopyFile), new PropertyMetadata(“”));
[ValidationOption(ValidationOption.Optional)]
public string ListName
{
get { return ((string)(base.GetValue(CopyFile.ListNameProperty))); }
set { base.SetValue(CopyFile.ListNameProperty, value); }
}
public static DependencyProperty ListUrlProperty = DependencyProperty.Register(“ListUrl”, typeof(string), typeof(CopyFile), new PropertyMetadata(“”));
[ValidationOption(ValidationOption.Required)]
public string ListUrl
{
get { return ((string)(base.GetValue(CopyFile.ListUrlProperty))); }
set { base.SetValue(CopyFile.ListUrlProperty, value); }
}
public static DependencyProperty __ActivationPropertiesProperty = DependencyProperty.Register(“__ActivationProperties”, typeof(Microsoft.SharePoint.Workflow.SPWorkflowActivationProperties), typeof(CopyFile));
[ValidationOption(ValidationOption.Optional)]
public Microsoft.SharePoint.Workflow.SPWorkflowActivationProperties __ActivationProperties
{
get
{
return (Microsoft.SharePoint.Workflow.SPWorkflowActivationProperties)base.GetValue(CopyFile.__ActivationPropertiesProperty);
}
set
{
base.SetValue(CopyFile.__ActivationPropertiesProperty, value);
}
}
public static DependencyProperty __ContextProperty = DependencyProperty.Register(“__Context”, typeof(WorkflowContext), typeof(CopyFile));
[ValidationOption(ValidationOption.Optional)]
public WorkflowContext __Context
{
get { return (WorkflowContext)this.GetValue(__ContextProperty); }
set { this.SetValue(__ContextProperty, value); }
}
public static DependencyProperty __ListIdProperty = DependencyProperty.Register(“__ListId”, typeof(string), typeof(CopyFile));
[ValidationOption(ValidationOption.Optional)]
public string __ListId
{
get
{
return ((string)(base.GetValue(CopyFile.__ListIdProperty)));
}
set
{
base.SetValue(CopyFile.__ListIdProperty, value);
}
}
protected override ActivityExecutionStatus Execute(ActivityExecutionContext executionContext)
{
ISharePointService wfService = executionContext.GetService
try
{
//Your code
wfService.LogToHistoryList(executionContext.ContextGuid, SPWorkflowHistoryEventType.WorkflowComment, 0, TimeSpan.Zero, “Information”, “Operation completed”, string.Empty);
}
catch (Exception fx)
{
wfService.LogToHistoryList(executionContext.ContextGuid, SPWorkflowHistoryEventType.WorkflowComment, 0, TimeSpan.Zero, “Error”, “Operation stopped: ” + fx.Message + ” “, string.Empty);
return ActivityExecutionStatus.Faulting;
}
return ActivityExecutionStatus.Closed;
}
}
}
[/soucrecode]
As you can see i added in the Execute Method the following:
ISharePointService wfService = executionContext.GetService
This is a possibility to log information in your activity. In the catch area you can see that i am logging the error. You can also add do some logging in the try block and bring some information about the operations.
In order to bring this custom workflow action to life, we need to define a so called .actions file, which basically is a xml-structured file to define the action name, description, classnames and the input und and output. That is necessary for the use of it in SharePoint Designer.
[sourcecode language=”csharp”]
< ?xml version="1.0" encoding="utf-8" ?>
[/sourcecode]
Some explanations to this. XXXXXXXXXXXXXXXXXXXX
Well, at last point we need to add an assembly entry to the web.config of your Sharepoint Server. But we can do it by using a feature event receiver, so in this code we will be flexibel and can use relative paths.
Add a feature to your solution and change the scope to webapplication. Add a feature event receiver to it and use this code for adding it the webconfig.
Notice: Please test the following webconfigmodification in your dev system, cause it can have side effects to other parts of your web.config.
[sourcecode language=”csharp”]
protected string assembly = “aspSPDActivity.CopyFile, Version=1.0.0.0, Culture=neutral, PublicKeyToken=bab37e6505ee834d”;
protected string namespace_ = “aspSPDActivity”;
public override void FeatureActivated(SPFeatureReceiverProperties properties)
{
SPWebApplication currentWebApp = (SPWebApplication)properties.Feature.Parent;
AddAuthorizedType(currentWebApp, assembly, namespace_);
}
private void AddAuthorizedType(SPWebApplication webApplication, string assembly, string namespace_)
{
SPSecurity.RunWithElevatedPrivileges(delegate
{
var modification = new SPWebConfigModification();
modification.Path = “configuration/System.Workflow.ComponentModel.WorkflowCompiler/authorizedTypes/targetFx”;
modification.Name = “PublishFiles”;
modification.Sequence = 0;
modification.Type = SPWebConfigModification.SPWebConfigModificationType.EnsureChildNode;
modification.Value = string.Format(“
webApplication.WebConfigModifications.Clear();
webApplication.WebConfigModifications.Add(modification);
webApplication.Update();
webApplication.Farm.Services.GetValue
});
}
[/sourcecode]
You might notice a difference. The node <targetfx> exists since SP2013. That means if you want to deploy it to SP2010 you should keep this in mind. Cause we working on a SharePoint 2013 platform using the workflow 2010 platform we have to put our entry inside of <targetfx>. If it is outside it won’t work. It would throw an error which says that it could found the namespace or type of assembly. If you like you could add a relay which decides automatically on which platform it is and how to add the assembly.
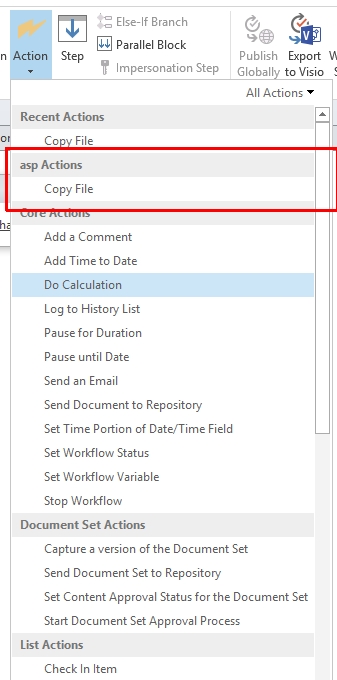
After deployment it should look like this in SPD:
So, now it’s your turn, to put some extra stuff to your SharePoint Designer Workflow actions:) Some ideas might be to copy files from one site collection to another or to convert documents to pdf, or anything you need.
Nice article, really helpful for user who have some experience with Workflow development